Minimal Steps to Fake Authenticode Signature (Self-Signing)

Here are the minimum steps required to self-sign an executable for development and testing:

makecert -sv mykey.pvk -n "CN=MyCompany" -len 2048 mycert.cer -r
pvk2pfx -pvk mykey.pvk -spc mycert.cer -pfx mycert.pfx -po mypassword

Note: You’ll be prompted to create a certificate password and it must match whatever you supply to pvk2pfx with the -po switch.

To sign an executable, use:

signtool sign /f mycert.pfx /t http://timestamp.comodoca.com/authenticode /v executable.exe

Note: once you have a real code signing certificate, you’ll use whatever timestamp server your provider gives you. Comodo works fine for self-signing testing purposes.

To automatically sign a binary at build-time in Visual Studio, add go to your Project Settings | Build Events | Post-Build Event, and add something like this to the Command Line setting:

signtool sign /f MyCertificatePath\mycert.pfx /p mypassword /t http://timestamp.comodoca.com/authenticode /v $(TargetPath)

Explanation of makecert command:

-sv Specifies the private key file.

-n Specifies the certificate name.

-len Generated key length, in bits. This StackOverflow answer indicates that Microsoft released an update blocking certificates with keys under 1024 bits long.

-r Specifies self-signed, i.e. not a root certificate.

Posted in Technology, Windows | Leave a comment

Enabling uiAccess in Visual Studio C++ Projects

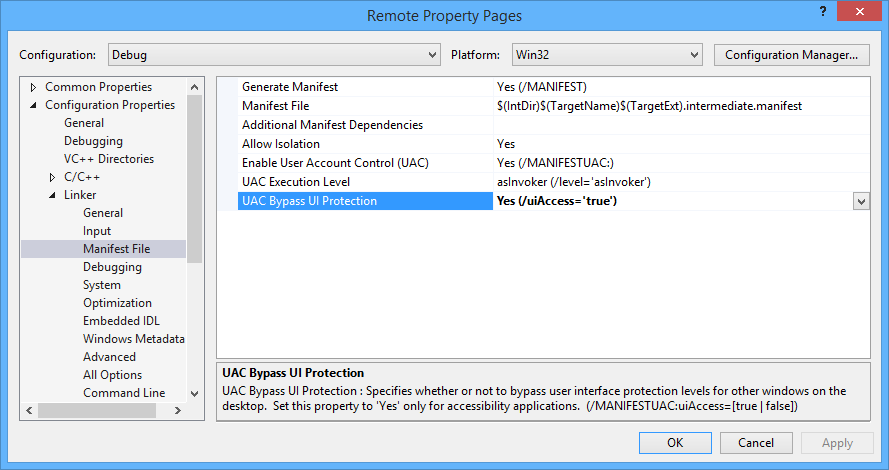
After spending too much time fiddling with my project’s Manifest Tool settings, trying to import an “Additional Manifest File”, I realized the solution was actually really simple. Under Project Settings | Linker | Manifest File, there is a simple dropdown for “UAC Bypass UI Protection” which sets uiAccess to true.

VisualStudio_PropertyPages_Linker_ManifestFile_uiAccess

Posted in C++, Technology, Windows | Leave a comment

Windows Console and Double/Multi Byte Character Set

The Windows Console doesn’t support Unicode. It does, however, support Double Byte Character Sets using Code Pages. By changing the system locale, the Console can display Japanese, Korean, and Chinese text:
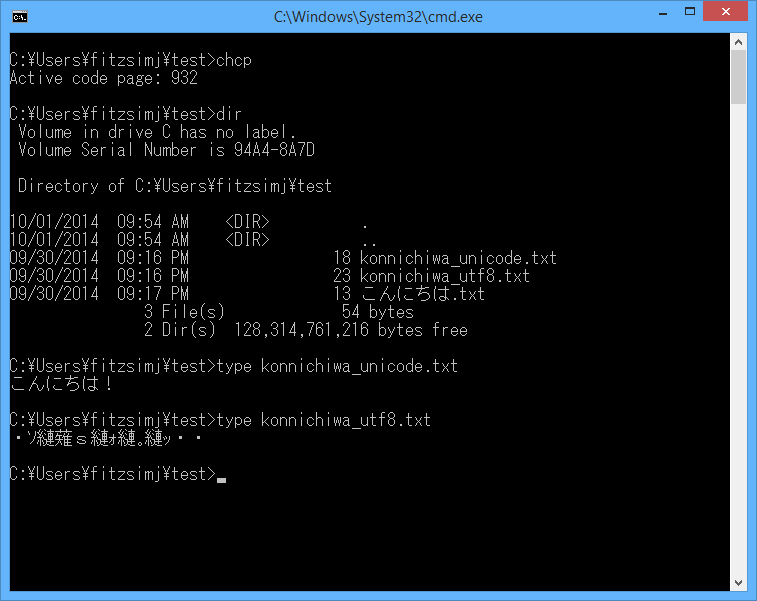
Code Page 932, Japanese file names and Unicode file content work correctly, UTF-8 file content is gibberish.

Terminology

UTF-8 and UTF-16 are types of Unicode. However, it’s common on Windows to refer to UTF-16 as Unicode, and UTF-8 as UTF-8. I will follow this convention. DBCS (Double Byte Character Set) is the only type of MBCS (Multi Byte Character Set) supported by legacy (i.e. non-Unicode) Windows applications. Japanese, Chinese, and Korean are supported via DBCS encodings. None of these DBCS encodings are Unicode, and all of them are proprietary Microsoft implementations of other standards.

Code Pages Supported by Windows

Windows supports four Double Byte Character Set code pages:

  • 932 (Japanese Shift-JIS)
  • 936 (Simplified Chinese GBK)
  • 949 (Korean)
  • 950 (Traditional Chinese Big5)

The available code pages are determined by your System Locale. If your System Locale is set to “English (United States)”, then these code pages will be unavailable to you. In this post, I will only be covering Japanese, since it’s the only language with which I have any familiarity. The steps and results would be similar for the other languages.

How to Change System Locale

To change your system locale, go into “Change date, time, or number formats”:

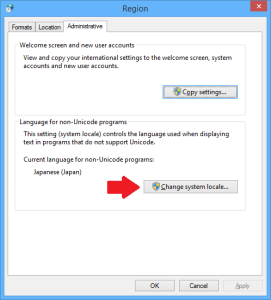
StartMenu_ChangeDateTime Select the Administrative tab, and click on “Change system locale”. Select the new system locale, click OK, and reboot. The system must be rebooted to change the system locale:
SystemLocaleSetting

Windows Console Font and Code Page

The font typically recommended for Japanese output is MS Gothic. I have, however, found that Japanese text displays with the Terminal font selected, but it’s entirely possible that the UI is lying to me.

To change the Windows Console code page, use the chcp command. chcp with no arguments will display the active code page.

Code Page 932 (Japanese Shift-JIS)

With the code page set to 932 (Japanese Shift-JIS), the path separator character will change into the Yen symbol (because only the backslash and tilde characters differ from ASCII in the lower 7-bits of Shift-JIS). Japanese file names will display in Japanese, as will text saved as Unicode. Japanese text saved as UTF-8 will display as gibberish:
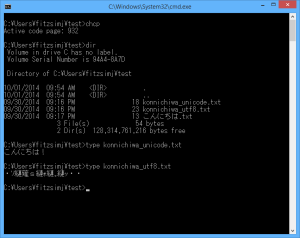
CMD_CodePage932_SystemLocaleSetTo932_MSGothicFont

Code Page 65001 (UTF-8)

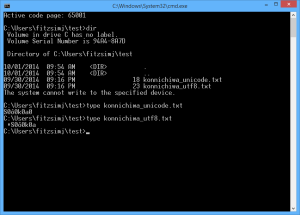
I have found that it will sometimes work to set the code page to 65001 (UTF-8). Japanese filenames, Japanese Unicode file content, and Japanese UTF-8 content will all three display, as shown below. However, when I experimented with this it stopped working after changing fonts and code pages a few times. My final impression is that it should work, but that the Console has some bugs in this regard.
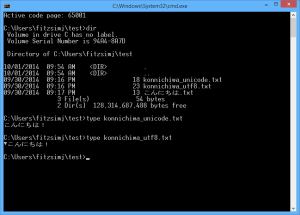
CMD_CodePage65001_SystemLocaleSetTo932_RasterFont

Here’s a screen shot of the Console after code page 65001 stopped working as expected: Code Page 65001 (UTF-8), Japanese output stopped working
References

Posted in Technology, Windows | Leave a comment

Add Day of Week To Taskbar

Do you want to see the day of week displayed on the Windows Taskbar clock?

Day of Week on Taskbar Clock

Go to the Start Menu and open “Change date, time, or number formats”

StartMenu_ChangeDateTime

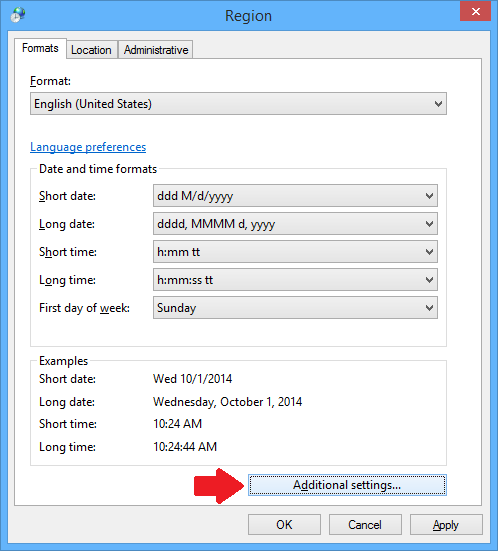
In the Region dialog, on the Formats tab, click on “Additional settings…”

Region_Formats_AdditionalSettings

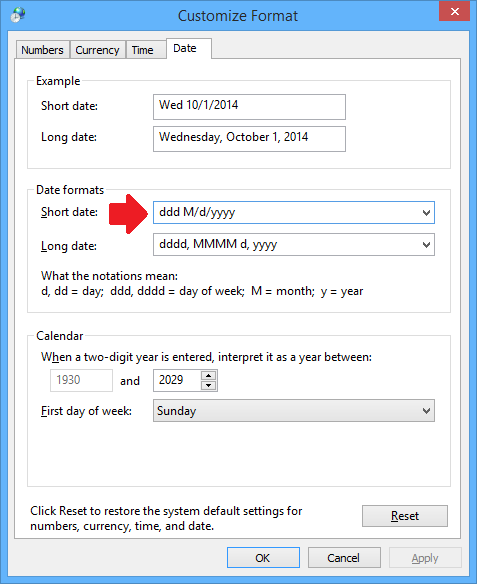
In the Customize Format dialog, click on the Date tab. In the “Short date” text box, add ‘ddd’ for the abbreviated day (e.g. Sun, Mon, Tue, Wed), or ‘dddd’ for the full day name:

DateTimeFormats_CustomizeFormat

Given that, chances are, you know what year it is, there’s not much point in showing it on the Taskbar. Consider using “ddd M/d” instead:

Taskbar - Day of week with no year

Posted in Uncategorized | Leave a comment

Mediawiki Error: “Error creating thumbnail: Unable to save thumbnail to destination”

I have an older Mediawiki installation which, after upgrading to version 1.23.0, I began to see errors like:

Error creating thumbnail: Unable to save thumbnail to destination

The problem turned out to be the temporary folder setting in LocalSettings.php. It was pointing to ‘tmp’ under ‘images’, which didn’t exist. Instead, there was a folder named ‘temp’. The solution was to change:

$wgTmpDirectory     = "{$wgUploadDirectory}/tmp";

into:

$wgTmpDirectory     = "{$wgUploadDirectory}/temp";
Posted in Technology | 1 Comment

Unicode and the Windows Console

Update: after several more hours of Googling and experimenting, I have found a way to display Japanese in the Console. For more information, check out my new post, “Windows Console and Double/Multi Byte Character Set“. The rest of this post is still accurate with regards to Unicode support and Western system locales.

Have you been hoping to see Japanese (or Thai, Hindi, Arabic, etc.) characters appear when you type dir into your command prompt? Well, prepare to be disappointed, as the Windows CMD.exe Console cannot display Unicode characters. You’ll have to use the Powershell ISE if you want to see full Unicode text output.

The best that the Command Shell can do is to write out boxes or question marks and, when characters are marked and copied, the clipboard will be populated with the correct Unicode characters. Those characters can then be pasted into smarter executables, like Notepad.

Michael S. Kaplan, an expert on all things Unicode and Microsoft, wrote about this at great length on MSDN Blogs. Unfortunately, Microsoft decided to wipe his blog from the Internet, even though it breaks links from the likes of Raymond Chen’s The Old New Thing.

Michael’s relevant blog posts can be found on The Internet Archive’s Wayback Machine:

Posted in Technology, Windows | 1 Comment

Biostar TF7050-M2 Gigabit Ethernet under Ubuntu

After several years of not bothering, I finally got Gigabit ethernet working on my old Linux server, which has a Biostar TF8050-M2 motherboard. The motherboard has a Realtek 8111B PCI-E LAN controller, which is supposed to be 10/100/1000 (Ethernet, Fast Ethernet, Gigabit) capable, but when transferring files over Samba, I never saw more than 10 megabytes per second. After fixing the issue, my network transfers jumped to 41MB/s, as reported by TeraCopy.

Verify Current Speed

To verify that you’re running at less that Gigabit speeds, run ethtool. Here’s the output after I fixed my problem:

$ ethtool eth0
Settings for eth0:
        Supported ports: [ TP ]
        Supported link modes:   10baseT/Half 10baseT/Full
                                100baseT/Half 100baseT/Full
                                1000baseT/Full
        Supported pause frame use: No
        Supports auto-negotiation: Yes
        Advertised link modes:  10baseT/Half 10baseT/Full
                                100baseT/Half 100baseT/Full
                                1000baseT/Full
        Advertised pause frame use: Symmetric Receive-only
        Advertised auto-negotiation: Yes
        Speed: 1000Mb/s                             <=== Look at this line
        Duplex: Full
        Port: Twisted Pair
        PHYAD: 0
        Transceiver: internal
        Auto-negotiation: on
        MDI-X: Unknown

If your listing shows "Speed: 100Mb/s", then you're only getting Fast Ethernet (100 megabits per second) speeds.

Replace the Driver

I replaced the default Realtek driver, which is for the r8169 (check which driver you have by running lsmod | grep r.* and look for something like r8169), with an updated R8168 driver from the Realtek website.

I followed the instructions from this Ubuntu Forums post, but I found that they can be reduced to the following:

  1. Download the latest drivers from the Realtek site.
  2. Unpack the archive (tar xvjf r8168-x.xxx.xx.tar.bz2).
  3. Change into the new directory and execute autorun.sh with administrative privileges (cd r8168-x.xxx.xx followed by sudo ./autorun.sh).

The autorun.sh script will automatically remove the existing r8169 module and replace it with the correct r8168 one. This worked, even over an ssh session, though the connection dropped while the operation completed.

Power Cycle the Switch

After updating the driver, I was still only seeing Fast Ethernet speeds. The lights on my Linksys GS105 switch indicated 100Mb/s connections. Unplugging and re-plugging cables would sometimes change the indicators to Gigabit, and other times it would simply kill the connection. I finally unplugged the switch for thirty seconds, plugged it back in, and suddenly had Gigabit speeds.

Posted in Linux, Technology | Leave a comment

Visual Studio Debugging – Accessibility Applications with uiAccess Attribute Set

Debugging the application from Visual Studio first resulted in a dialog telling me I needed to restart Visual Studio as Administrator. After doing so, trying to run in the debugger resulted in an error that read, “Unable to start program” and “The application manifest has the uiAccess attribute set to ‘true’. Running an Accessibility application requires following the steps described in Help.” Of course, the ‘Help’ button takes me nowhere useful.

Running the application from Explorer resulted in a dialog that said, “A referral was returned from the server.”

  1. Find the signed executable in Windows Explorer.
  2. Right click and select Properties.
  3. Select the Digital Signatures tab.
  4. Double-click the signature.
  5. Click View Certificate.
  6. Click Install Certificate.
  7. Click Next.
  8. Select “Place all certificates in the following store”.
  9. Select a “Trusted Root Certificate Authorities”.
  10. Click OK.
  11. Click Next.
  12. Click Finish.
  13. In the Security Warning dialog, click Yes.

This allows the executable to be run directly. Unfortunately, it still doesn’t fix the issue with debugging from Visual Studio. It appears that the only solution is to run the executable directly, then attach the debugger to the running process!

Posted in Technology, Windows | Leave a comment

Exporting Visual Studio-compatible Bitmaps from GIMP

Gimp_ExportingForVisualStudio_Options

When exporting bitmaps from GIMP, two options must be selected in order for the bitmaps to be compatible with Visual Studio:

  1. Under Compatibility Options, check “Do not write color space information”.
  2. Under Advanced Options, select “R8 G8 B8” under 24 bits.
Posted in Technology, Windows | 1 Comment

Microsoft IME for Japanese Input

I’ve found the keyboard shortcuts for the Microsoft IME (Input Method Editor) to be poorly documented. I’ve tried to collect all of them here.

Switching Between Input Languages

MicrosoftIME_JapaneseInputLanguageMenuThese keyboard shortcuts switch between, for example, English and Japanese input languages. This is equivalent to clicking on the language abbreviation (e.g. EN, JP) in the IME Toolbar.

Left Alt + Shift or
Ctrl + Shift or
Grave Accent (`) – switch input language (default is Left Alt + Shift)

Ctrl + Shift or
Left Alt + Shift or
Grave Accent (`) – switch keyboard layout (not assigned by default). An example of usage would be to switch between “US” and the “United States – International” keyboard layouts, assuming they have been configured in Text Services and Input Languages.

Switching Between Input Modes

MicrosoftIME_JapaneseInputMenuOnce Japanese language input is selected, the following shortcuts can be used to change the input mode between hiragana, katakana, and alphanumeric. This is equivalent to clicking on the input menu in the IME bar:

Ctrl + Caps Lock – switch to hiragana

Alt + Caps Lock – switch to katakana

Shift + Caps Lock – switch between full-width hiragana and full-width alphanumeric (romaji).

Alt + Grave Accent (`) – switch between kana and half-width alphanumeric (romaji).

String Conversion

When typing using IME, while a sequence is still underlined, these shortcuts can be used to convert the underlined portion between hiragana, katakana, romaji, both full- and half-width. Note that these conversions cannot be performed after moving on to the next input block (i.e., it is not possible to double-click and existing word and convert it).

F6 - converts to hiragana:

ホワイト becomes ほわいと

F7 – converts to katakana:

ほわいと becomes ホワイト

F8 – converts to half-width katakana:

ホワイト becomes ホワイト

F9 – converts to full-width romaji, press again for all-capitals, then again for proper noun capitalization:

ホワイト becomes howaito, press F9 again for HOWAITO, and again for Howaito

F10 – convert to half-width romaji, press again for all-capitals, and again for proper noun capitalization:

ホワイト becomes howaito, press F10 again for HOWAITO, and again for Howaito

More Conversion Examples

Typing katakana, then pressing F10 and F7 alternately will convert the string back and forth between katakana and half-width romaji.

Typing hiragana, then pressing F10 and F6 alternately will convert the string back and forth between hiragana and half-width romaji.

Typing hiragana, then pressing F7 and F6 alternately will convert the string between hiragana and katakana.

Typing katakana, then pressing F6 and F7 alternately will convert the string between katakana and hiragana.

Quotes

MicrosoftIME_QuoteCharactersBasic opening and closing quotes (「」), type the left and right bracket ([, ]), respectively. To access more quote styles, type the open or closing bracket, then press the space bar for the conversion menu. Another option is to type kakko (Japanese for “brackets”), press the space bar for the completion menu, and scroll down.

「」 〈〉 《》

Katakana-specific Shortcuts

These shortcuts only have meaning in the katakana input mode.

Long vowel – press the ‘minus’ key (next to equals on US keyboards):

ソーダ (soda)

Separator – type a forward slash ‘/’:

ジョン・ホワイト (John White)

Traditionally, Japanese doesn’t have a “ti” sound, so it was translated as チ (chi, e.g. ticket becomes “チケット”, “chiketo”). In order to write ‘ti’, type thi or texi. For ‘di’, type dhi or dexi.

ティ・ディ

Posted in Technology, Windows, 日本語 | Leave a comment