SSH Tunneling Windows RDC

This article explains how to securely port-forward Windows Remote Desktop (Terminal Services) over SSH, using standard SSH command line syntax. If you prefer to use GUI SSH tools, such as PuTTY, there are other guides for that.

Terminology Notes

My terminology assumes that you are connecting to a machine on your home network, which is protected by a firewall. However, the diagrams and commands are valid regardless of whether the remote network is at home or not.

Additionally, I use RDCHOST to represent the local name or IP of your RDC server within the home network, and my_home_ip to represent your home IP address as visible from the Internet.

Prerequisites

  • Depending on network configuration, port-forwarding may have to be configured on the firewall.
  • An SSH client (e.g. Cygwin’s OpenSSH for Windows) must be installed on the local machine.
  • An SSH server (e.g. Cygwin’s OpenSSHD for Windows) must be present on some machine within the home network.
  • SSH keys must be generated and deployed appropriately.

SSH Command Syntax

ssh -C -N -L localPort:destinationHost:3389 proxyHost

  • localPort is the port on localhost through which you wish to connect.
  • destinationHost is the Remote Desktop host, as it appears on the home network.
  • proxyHost is the host running SSHD, through which you will tunnel.

Configuration 1: Discrete Servers

This configuration has the firewall port-forward SSH to a server on the home network, which proxies the connection to the RDC server:

                       +-----------[ Home Network ]---------------+
                       |                                          |
localhost <----> Home Firewall <---> SSH Server <---> RDC Server  |
                       |                                          |
                       +------------------------------------------+

Command line:

ssh -C -N -L 6009:RDCHOST:3389 my_home_ip

Configuration 2: Combined RDC & SSH Servers

In this configuration, the RDC server also has an SSH server, and the firewall port-forwards directly to it:

                       +------[ Home Network ]-----+
                       |                           |
localhost <----> Home Firewall <-----> RDC & SSH   |
                       |                Server     |
                       +---------------------------+

Command line:

ssh -C -N -L 6009:localhost:3389 my_home_ip

Configuration 3: Firewall as SSH Server

In this configuration, the firewall acts as the SSH server, proxying the connection directly to the RDC server on the home network:

                       +----[ Home Network ]----+
                       |                        |
localhost <----> Home Firewall <---> RDC Server |
                  & SSH Server                  |
                       |                        |
                       +------------------------+

Command line:

ssh -C -N -L 6009:RDCHOST:3389 my_home_ip

Additional Suggestions

Rather than specifying the IP address of your home firewall, I suggest using DynDNS to get a dynamic DNS entry.

Posted in Linux, Scripting, Technology, Windows | Leave a comment

Rikaichan: Perfect Tool for Japanese Learners

The Rikaichan Project is a Firefox plugin which pops up translations information for Japanese characters.

Rikaichan-Example

Usage:

  1. Install the Rikaichan plugin.
  2. Restart your browser.
  3. Navigate to a page with Japanese characters.
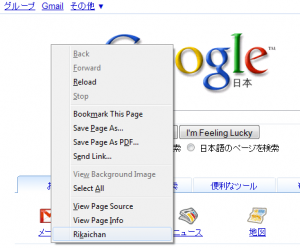
  4. Right-click on the page and select Rikaichan (see image below).
  5. Hover the mouse over characters to see a pop-up translation.

Rikaichan-Enable

Posted in 日本語 | Leave a comment

Run External Application as Another User in C#

An arbitrary external application can be executed from C# using System.Diagnostics.Process. If you want to run as another user, setting the System.Diagnostics.Process.StartInfo.Password field can be a bit confusing. Here is one way using System.Security.SecureString.AppendChar to avoid having to resort to unsafe code:

using System;
using System.Collections.Generic;
using System.Linq;
using System.Text;

namespace CSRunAs
{
    class Program
    {
        static void Main(string[] args)
        {
            System.Diagnostics.Process p = new System.Diagnostics.Process();
            
            // Domain and User Name:
            p.StartInfo.Domain = "optional_domain";
            p.StartInfo.UserName = "user_to_run_as";

            // Command to execute and arguments:
            p.StartInfo.FileName = "c:\\path\\to\\executable.exe";
            p.StartInfo.Arguments = "your argument string";
            
            // Build the SecureString password...
            System.String rawPassword = "your_password";
            System.Security.SecureString encPassword = new System.Security.SecureString();
            foreach (System.Char c in rawPassword)
            {
                encPassword.AppendChar(c);
            }
            
            p.StartInfo.Password = encPassword;

            // The UseShellExecute flag must be turned off in order to supply a password:
            p.StartInfo.UseShellExecute = false;

            p.Start();
        }
    }
}
Posted in .Net, C#, Technology | 1 Comment

Install Trillian 3.1 on Windows 7

Trillian’s installer complains that it cannot create “buddy.dll”.

An ugly workaround is to right-click on the installer executable and select “Run As Administrator”.

Posted in Technology | Leave a comment

Windows 7 Install Freezing at “Starting Windows” Animation

Windows 7 was very troublesome to install on my system. My system specifications:

  • Motherboard: Biostar TF8200 A2+ (nVidia chipset)
  • Processor: AMD 4080e Athlon 64 x2 (45W version)
  • Memory: 4GB
  • Optical: Sony/NEC SATA DVD-RW
  • Hard Disk: Seagate SATA 320GB, 7200RPM

Installation would hang at the “Starting Windows” logo. By pressing F8 when the installer first loaded, and selecting “Safe Mode With Command Prompt”, I was able to see that it was hanging after loading DISK.SYS.

I experimented with SATA and AHCPI modes. I replaced the old PATA/IDE DVD-ROM drive with a new SATA one. I tried removing one of my 2GB memory sticks. I tried both the x64 and x86 versions. None of these changes made any difference whatsoever

In the end, the only thing that worked was to turn off all motherboard accessories. I believe I only needed to turn off the USB 2.0 controller, but to be safe I turned off all USB, audio, parallel port, floppy drive, etc.

Now that Windows 7 is fully installed, I’m still unable to use the USB 2.0 functionality.

As an aside, I reinstalled the OS two more times because I kept getting a black screen with the “Windows Release Candidate Build 7100” in the lower, right corner. After several frustrating hours, I realized that the problem was simply that I had both the VGA and DVI connectors plugged into my monitor! The installation had been continuing just fine, but on the other monitor input!

Posted in Hardware, Technology | 10 Comments

Cheap Bear Canisters

Harbor Freight Bear CanisterHarbor Freight, of all places, sells a bear canister for a mere $29.87. It looks an awful lot like the Garcia Bear-Resistant Container at REI, which sells for $69.95.

I’ve heard this bear canister isn’t approved for use in the Sierra. I have no idea what, if any, certification it’s received.

Posted in Backpacking | 2 Comments

Boot from USB Stick on Biostar TF8200 A2+

I was tired of burning perfectly good DVDs repeatedly for Windows 7 beta testing. Instead, I decided to follow these excellent instructions and copy the contents of the ISO image onto a USB stick and boot from that.

My Biostar TF8200 A2+ motherboard has an American Megatrends BIOS. Configuring it to boot from a thumb drive is a bit tricky. Here are the steps:

  1. Insert the USB thumb drive.
  2. Enter BIOS setup.
  3. Go to Advanced, then USB Configuration, then USB Mass Storage Device Configuration, then select CDROM for Emulation Type.
  4. Press F10 to save BIOS changes and reboot. You must reboot for the BIOS to view the thumb drive as a CD-ROM drive.
  5. Enter BIOS Setup.
  6. Go to Boot, then CD/DVD Drives. Select “USB: USB DISK 2.0” as your 1st CD drive (assuming you have a real CD/DVD-ROM drive).
  7. Go back to Boot Settings Configuration, go to Boot Device Priority, and select USB: USB DISK 2.0 as the 1st boot device.
  8. Save BIOS changes and reboot.
  9. When prompted, press any key to boot from the “CD-ROM” (really the USB stick).

In the end, I wasn’t able to get the system to boot from the USB drive as a virtual CD-ROM drive. It would only boot from the USB drive if I changed the emulation to “Hard disk”.

Posted in Hardware, Technology | Tagged , , , , , , , , , | 5 Comments

Better GMail Causes 100% CPU Usage in Firefox

For the last several weeks, I’ve noticed excessive CPU usage whenever GMail (GAYD-hosted email, specifically) is open in Firefox. By turning off add-ons one at a time, I found that this is caused solely by Better GMail 2.

Firebug, FireGPG, Greasemonkey (on which Better GMail relies), and AdBlock Plus all had no effect on CPU usage.

Posted in OS X, Technology | Leave a comment

Tearing on MythTV with VLC

After updating to Ubuntu 8.10, I started to get tearing artifacts. This crop up especially badly during scenes that involve panning.

The MythTV Wiki explains the fix for tearing:

echo 1024 > /proc/sys/dev/hpet/max-user-freq

Well, it works for me, anyway. I just keep forgetting what to do when it crops up.

Posted in Linux, Technology | Leave a comment

Can’t Log in to VMware Server Console on Ubuntu

As usual, I sped through the VMware Server installation, just using default settings. I then found myself unable to log in to the VMware Server Console. I would always get an error:

You do not have permissions to login to the server.

Some searching turned up a solution which is to log in as root and set a password (root has no password by default on Ubuntu). This is an ugly solution, so I re-ran VMware Server configuration. That’s when I noticed this question:

The current administrative user for VMware Server is 'root'. Would you like
to specify a different administrator? [no]

Answering yes allows you to specify the local account which will be administrator for VMware Server:

Please specify the user whom you wish to be the VMware Server administrator
[root] fitzsimj

Using fitzsimj as the VMware Server administrator.

Posted in Linux, Technology | Leave a comment